How To Request An Image Be Dynamically Generated By Stability To Display In Storyline
How To Request An Image Be Dynamically Generated By Stability To Display In Storyline
To request an AI-generated graphic from the Stability platform requires you to set up an Execute JavaScript trigger on your slide, using a trigger condition so that this happens at the exact moment that you wish it to for the user.
Here is a script example containing a simple prompt to generate a photograph of a subject which the user has typed (e.g. by typing into a text entry field which places what has been typed into a text variable named ‘UserRequest’):
let userTypedValue = getVar("UserRequest");

const imageRatioSetting = "16:9"; //Choices are 16:9, 1:1, 21:9, 2:3, 3:2, 4:5, 5:4, 9:16, 9:21
const removeBackground = "NO"; // YES or NO


let sendData = {
  'nonce': parent.storylineMagicNonce,
  'prompt': UserRequest,
  'aspect_ratio': imageRatioSetting,
  'remove_background': removeBackground
};

sendData = JSON.stringify(sendData);

const myHeaders = new Headers();
myHeaders.append("Content-Type", "application/json");
myHeaders.append("X-WP-Nonce", parent.storylineMagicRestNonce);

async function stability_req() {
  try {
    const response = await fetch(parent.storylineMagicEndpointStability, {
      method: 'POST',
      headers: myHeaders,
      body: sendData
    });

    if (!response.ok) {
      throw new Error(`HTTP error! status: ${response.status}`);
    }

    const data = await response.json();
    //console.log('Image URL:', data);
    setVar("ReturnedImageURL", data);
  } catch (error) {
    console.error('Error fetching data:', error);
  }
}

stability_req();
The end result of this script is that an image will be generated and stored within the wp-content folder of your WordPress website.
Once the image has been saved, a URL for where the image can be accessed is returned and stored to a Storyline text variable, in the case of the example above this will be saved as ReturnedImageURL.
Displaying the generated image on the slide to the user
Unlike text responses from the ChatGPT API, we cannot simply load the image into a published activity to be displayed to the user on the slide.
In order to accomplish this we must go through a process of replacing an existing image, already contained on a slide within our activity, to essentially swap out the source URL of the original image with the new URL generated by the Create Image API.
This follows the exact same process and principles as the steps we took in this previous article where we had dynamically generated an image using the Dall-E image model from OpenAI.
To accomplish this, simply follow the steps below which are also demonstrated in this video:
Step 1 – Add a blank image to your slide/layer which is the same dimensions as the image being generated (e.g. 1024x1024px)
If you need a blank PNG (fully transparent) image file to use in your project you can download one we created ourselves here – LINK
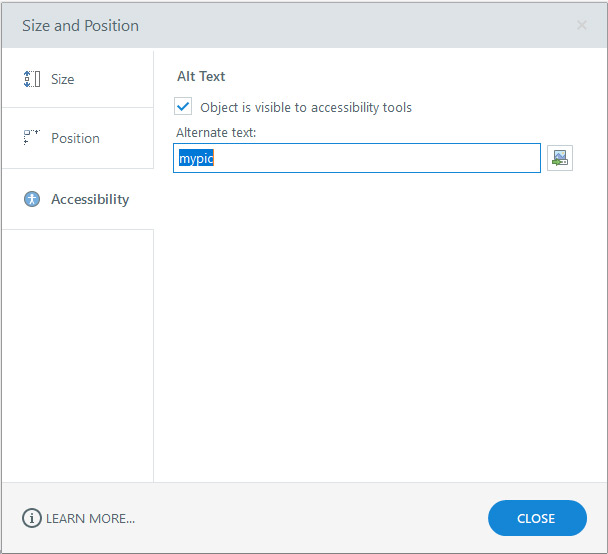
Step 2 – Add an Alternative Text value to the image
Right click on the image and open the Accessibility options. Here write an Alternative Text value into the box shown, and make sure the ‘Object is visible to accessibility tools’ tickbox is checked.
Tip – It is good practice to use this box to write alt text value relating to the image intended to be displayed, just make sure that you use no spaces or underscores between words if possible.
Step 3 – Create an Execute JavaScript command to trigger when the slide/layer containing the dynamically generated image will be opened
Into this Execute JavaScript script window, paste the following code snippet:
var imgsrc = getVar("ReturnedImageURL");

var container = document.querySelector('[data-acc-text="mypic"]');
var imgElem = container.getElementsByTagName('image')[0];
imgElem.setAttribute("xlink:href", imgsrc);
This code snipped will find the image element on the slide based on the Alt Text value that you applied in the previous step, and then replace the image source value with the URL that was generated by the Create Image API.
Step 4 – Show the slide/layer only when the dynamically generated image has been created
In order to prevent the slide/layer designed to display the dynamically generated image from being shown to the user too early, you can use a trigger in Storyline to show the slide/layer but only at the moment when the image URL variable in Storyline has a URL value in place to work with.
For example, your trigger may look something like this:
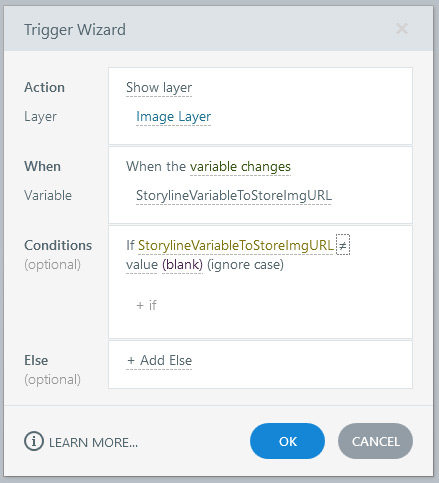
In this case the layer containing the image itself will only be displayed to the user once the variable containing the URL value needed is no longer empty.
For best results, try setting the start time of your image on the slide to be at least 0.5 seconds after the start of the timeline to allow for asynchronous scripts to complete in the order as required.
Read the rest of our Knowledge Base pages to make the most of eLearning Magic Toolkit.